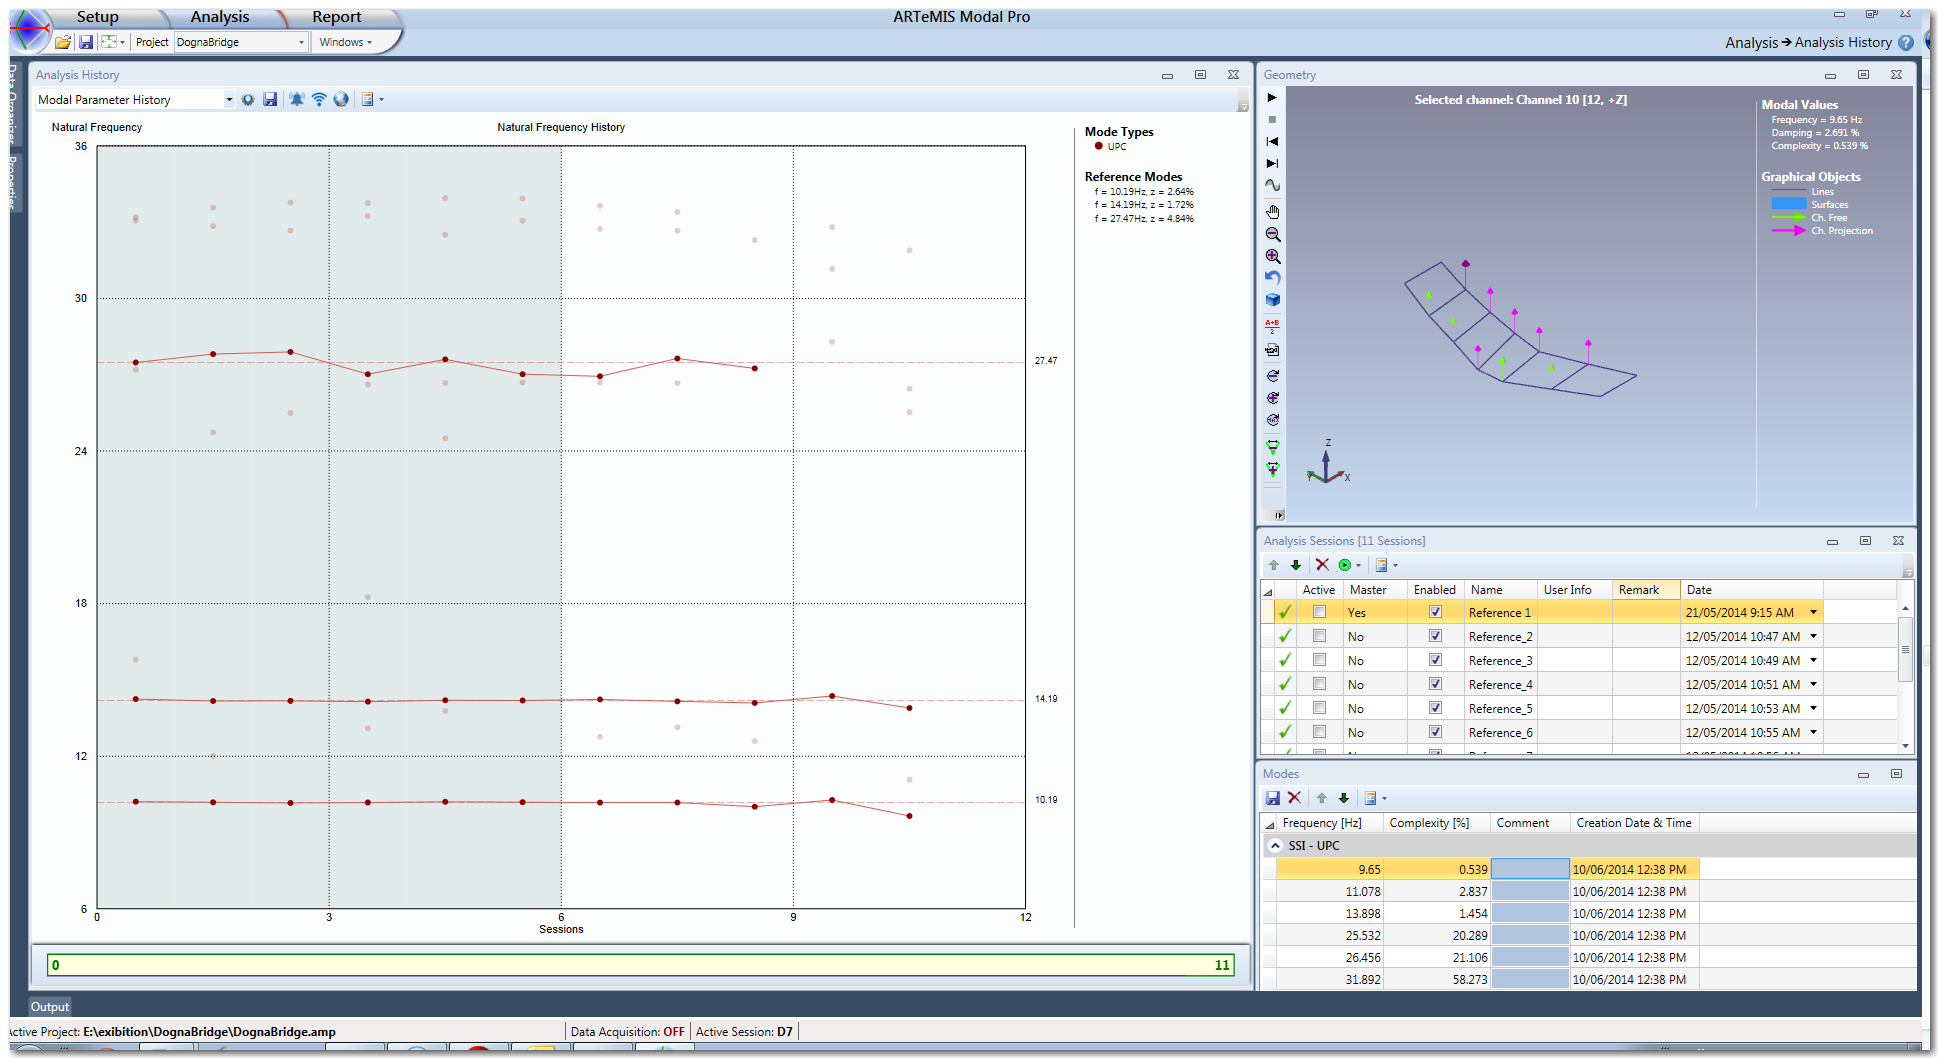
Similar to the Damage Detection Module, the modes of the structure can be presented in a historical view. The Modal Parameter History Module has been designed for this. It presents the modal parameters as a function of the Analysis Sessions. In addition, it can automatically track modes determined in a reference state. Even though they change slightly in subsequent Analysis Sessions, the Mode Tracking is capable of keeping track of them. The tracked modes are presented as modal indicators that are inter-connected. Pointing at the line with the mouse allows further information of the particular tracked mode.
Features:
- Historical presentation of natural frequencies and damping ratios.
- Historical export of modal parameters to SVS and UFF file formats.
- Automatic mode tracking based on the estimation of a set of reference modes obtained from a specified set of reference Analysis Sessions.
- Historical presentation of the tracked modes (Drawn interconnected). Natural frequencies and damping ratios - absolute and relative to their reference mode. Modal Assurance Criterion of the mode shapes relative to the mode shape of their reference mode.
- Historical export of tracked modes to SVS and UFF file formats.
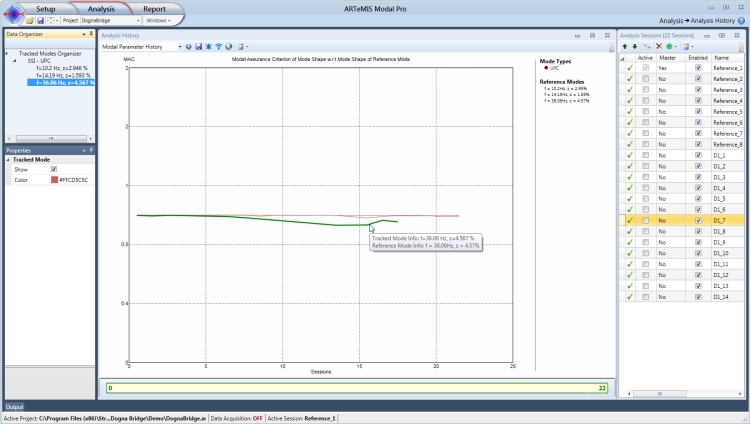
In the image below, the natural frequency of three tracked modes is presented. The two first modes are reasonable unaffected by the damage whereas the third mode is heavily influenced and even disappears for a while when damage occurs.
Mode Tracking
 button from the toolbar, will start the configuration dialog.
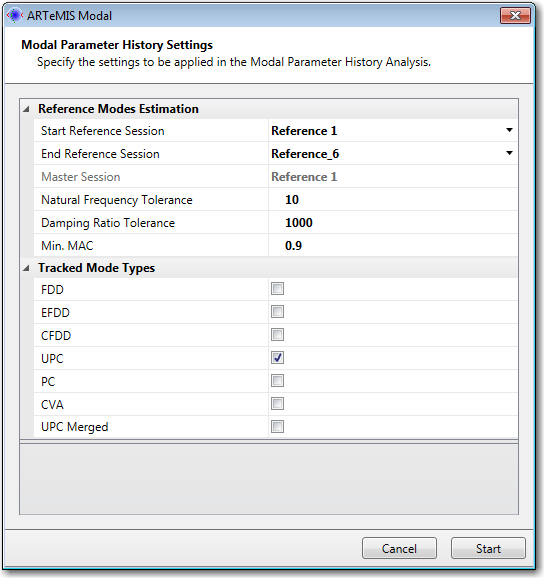
Mode Tracking Step 1 - Define Reference Modes
The first step in the mode tracking is to establish a set of reference modes. To do this a range of reference sessions is selected, and the software will look for all modes that are stable across these reference sessions. For the ones that are found stable mean values of the natural frequency, damping ratio ond the mode shape are then calculated. These mean values are called Reference Modes, and will be listed in the legend to the right of the window.
The range of reference sessions is specified by selecting the Start Reference Session and the End Reference Session the the above dialog. The search for stable modes across the reference sessions will then start from the first session selected and the second available session is then compared against the first. All modes that are within the specified tolerances are the stored. These modes are now being compared with the ones in the third available sessions and so on. There are three tolerances in use for this comparison. The Natural Frequency Tolerance and the Damping Ratio Tolerance are both given in percent. The default tolerance for frequencies is set to 10%, which means that the software will look for similar frequencies in the next reference session that can deviate up to 10% of the current sessions frequency. In case of the damping ratio the deviation is by default set to 1000% to indicate the damping has no significance in the search for the reference modes. The last tolerance is the Min. MAC that is the minimum Modal Assurance Criterion to have between the mode of the current session and any mode of the next reference session.
Besides the above settings it is also necessary to inform the software what type of modes to track on. All available modes are listed as check boxes in the section called Track Mode Types. Check the ones that you like to track. For better performance, always go with the minimum required set of mode types.
This step only have to set up once. For every new measurement uploaded to a new session the tracking will be called automatically once new modes are available.
The Reference modes are displayed with dashed lines in the Modal Parameter History window.
Mode Tracking Step 2 - Tracking Reference Modes
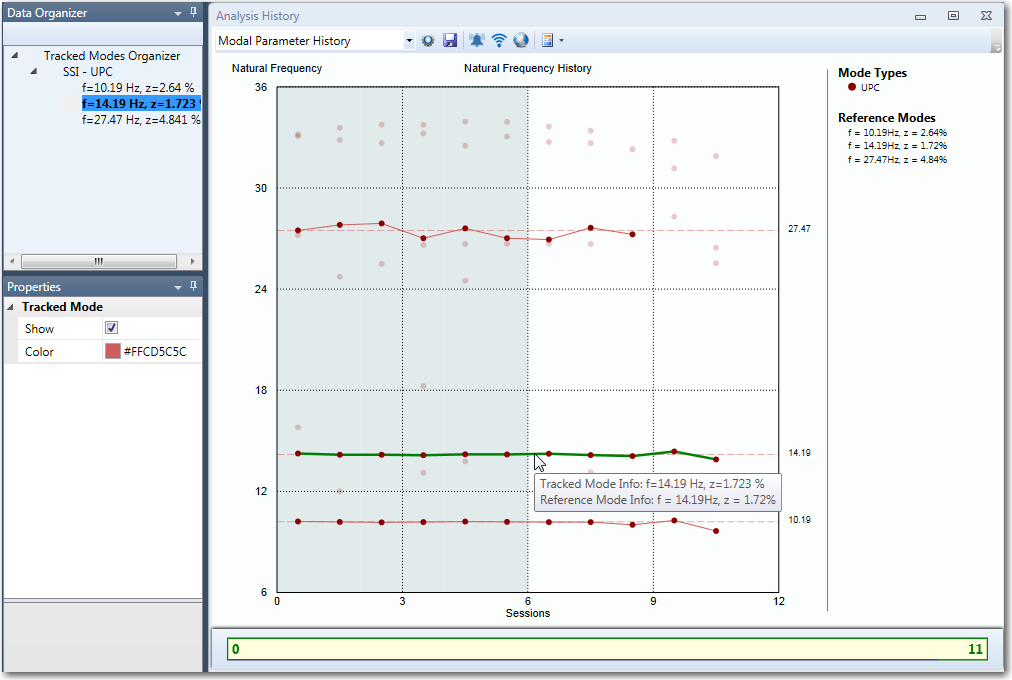
Once the estimation of the reference modes is finished the mode tracking for these in all sessions starts automatically and, the diagram like in the image below is displayed. The modes on the diagram are displayed with dotes. If a mode is being part of a tracked mode then the mode dot is fully visible, otherwise the dot is transparent.
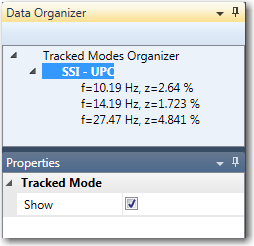
The tracked modes are displayed with full line connecting all of the mode dotes which are part of that tracked mode. Hovering over a tracked mode will highlight it. At the same time in the Data Organizer the corresponding Tracked Mode will be selected. If a Tracked Mode is selected in the Data Organizer, then from the Properties Window, the user can choose if a particular tracked mode should be visible or not. The user can also change the color for a particular Tracked Mode.
In case in the Data Organizer, an estimator (Mode Type) node is selected, the User can choose to show or hide all tracked modes from that estimator, from the Properties Window.
Hovering over a Mode dot will bring up the Mode information tooltip. Clicking on the Mode dot will automatically select the corresponding mode in the Modes Window.
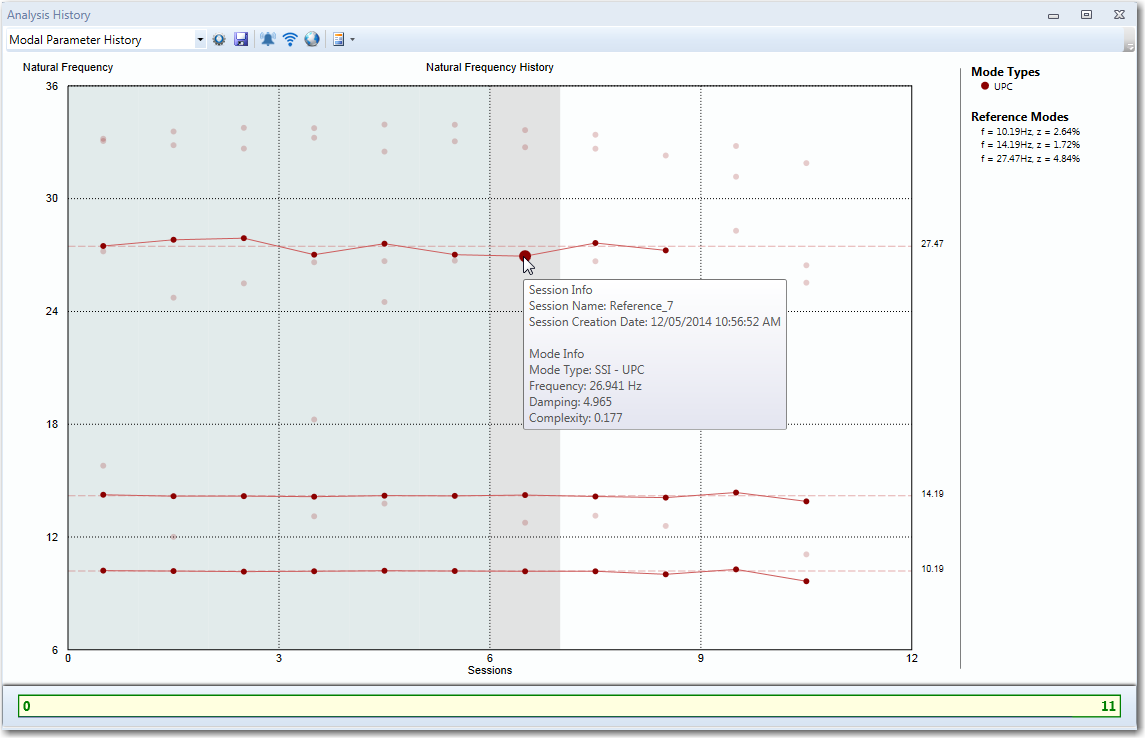
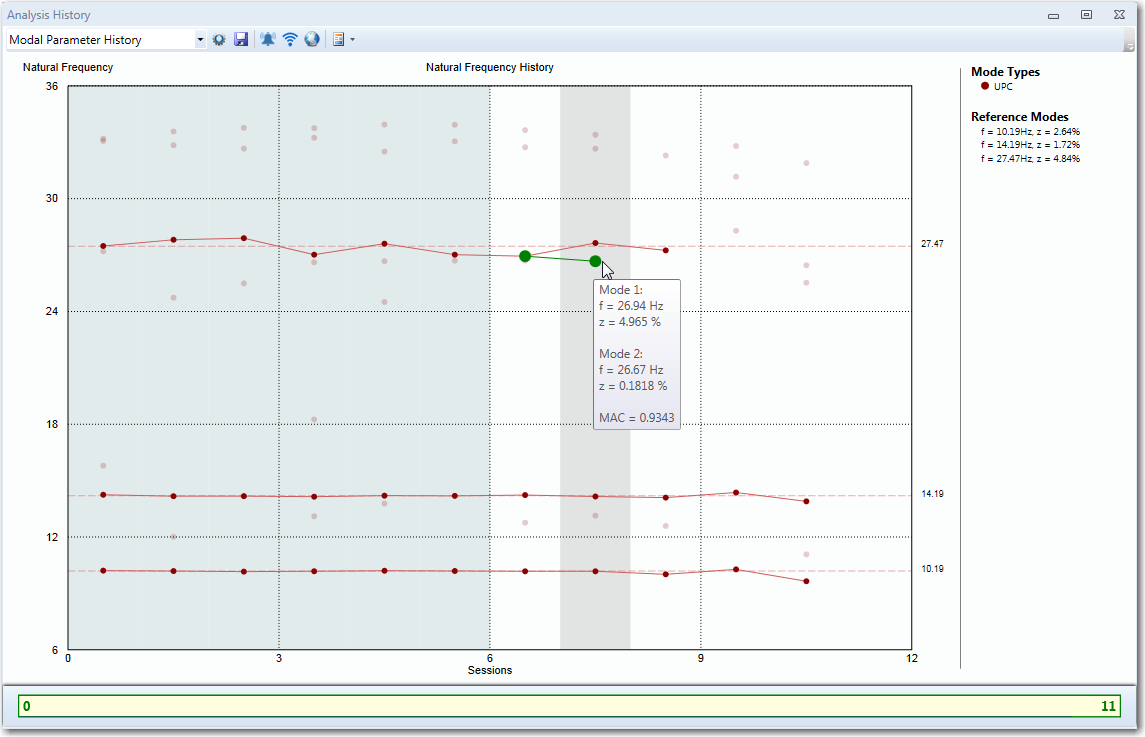
To validate the Mode Tracking and to check why a mode may or may not be included in a particular Tracked Mode, the user can use the tool for checking the MAC between two particular modes.
In order to do this the user should click on the first mode for comparison while holding the left or right Ctrl key on the keyboard. Then while holding the Ctrl key and moving the mouse over other mode nodes, a tooltip will be displayed giving the user the information for the MAC between the modes. The selected modes are highlighted with green color and connected with a green line like in the image below.
The user can also customize the Modal Parameter History through the Properties Window,

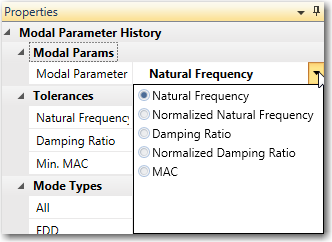
The Mode Tracking can also be presented in terms of other modal parameters such as the damping ratios and mode shapes. In case of the mode shapes, it will be the Modal Assurance Criterion between the reference state mode shape and the mode shape of the different Analysis Sessions.
Export Modes from all sessions
There is an export facility that allows the saving of all the modes presented in the Modal Parameter History window and specific export of the tracked modes. The user can export the modes by clicking on the  button.